

In electronic music, a clean mix tells the difference between an amateur and a professional. One way to achieve that is mid/side EQ - a technique you can't miss.
How does mid/side processing work?
Mid/side processing works best on a wide, stereo signal that we can split into two components.
An example of such a stereo signal can be an EBM bassline I made in Serum 2 during a private music production lesson:
For the purpose of this article, I made the bassline much wider than it needs to be. But thanks to that, it will be easier to explain the mid/side processing purpose.
Let's split that stereo bassline into two components as mentioned. In Ableton, I will add at the end of the effects chain Voxengo MSED - a simple mid/side processing plugin that's one of many great freeware plugins to have:
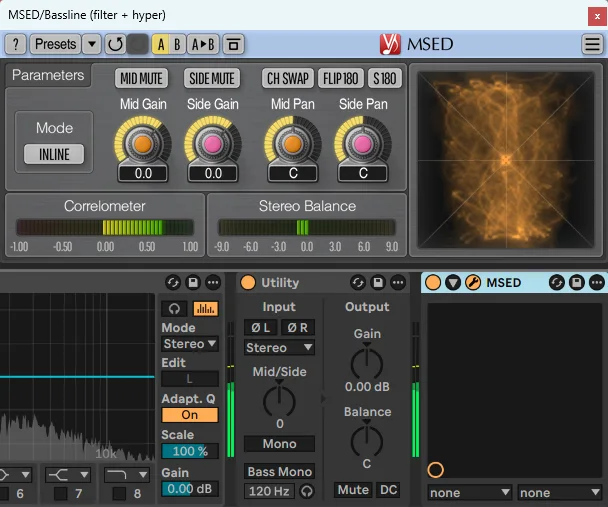
If I click the Side Mute button, I will listen to the Mid part of the bassline that I can call also the "mono" component of the sound.
Most of the bassline content will be in there. A Mid signal is as "centered" as possible, giving the sound a solid foundation - just like any mono sound.
This is also a part of the bassline that will be hearable on all devices - no matter if it's a car audio system, cheap headphones or a small, portable Bluetooth speaker:
If in the Voxengo MSED plugin, I click the Mid Mute button, I will listen to the Side part of the bassline that we can call the "stereo" component of the sound.
This part of a signal brings width to the bassline and makes it feel more huge and all-around - especially if you listen to it while wearing headphones that I recommend, even if it's only for the sake of this article.
While the Side signal gives the sound another dimension - the stereo width - you have to know that not all devices can play it back. Most of small, portable Bluetooth speakers are for example mono speakers. If you think of a consumer-grade 2.1 speakers set, a subwoofer speaker in that set is also a mono speaker.
This is what does the Side part of the bassline sound like:
Mid/side processing boils down to processing separately Mid and Side signals with various effects. Exciters or compressors can be used in the mid/side mode, but among many effects you can use, equalizers are used most often during mid/side processing.
When do you want to use mid/side EQ?
In the previous section, I played you the EBM bassline with extremely large stereo width, so you can easier hear the difference between the stereo and mono signal.
In reality, many sounds in your track are going to be much more narrow in the stereo field. For example, the EBM bassline originally sounded like this:
The less wide a sound is, the less sense it makes to apply mid/side equalization.
But how do we know when the sound is wide enough for mid/side equalization to make sense?
The Voxengo MSED plugin has a very useful Correlometer that gives a visual clue about the sound's stereo width:
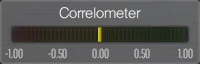
This meter is scaled from -1.00 to 1.00, where:
- -1.00 value tells that the signal in the left channel is completely out of phase with the signal in the right channel. This is what happens if you listen to the Side signal.
- 1.00 value means both left and right channels are perfectly in phase. This is the case of listening to the Mid signal.
Clicking the Mid Mute button in the plugin makes the Correlometer move all the way to the left:
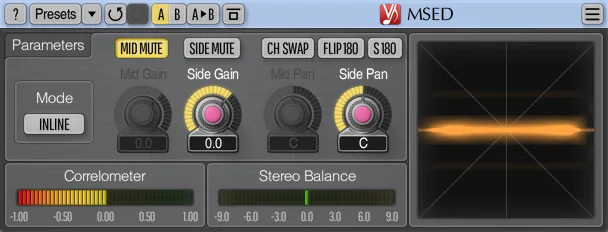
And after clicking the Side Mute button, you will see the Correlometer moving all the way to the right:
Stereo sounds - no matter if it's the whole mix of a track or a single bassline - will usually make the Correlometer move in range from 0.00 to 1.00. It means that the majority of the sound is in "mono", which is considered correct.
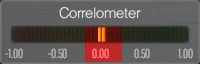
In this article, I will show you the mid/side equalization example of a reese bass that is a very wide sound in one of my tracks - the Correlometer even falls below the 0.00 value for a short while.
I highlighted in red the range in which the Correlometer is moving to show you better the stereo width of this sound:
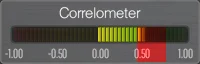
Another mid/side equalization example will include an atmospheric pad sound that's more narrow than the reese bass above, but it still has decent stereo width. This time, the Correlometer hovers around the 0.50 value:
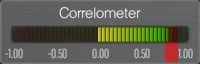
The last equalization example will process the whole mix of a track that, according to the Voxengo MSED, is much more narrow than the reese bass. The Correlometer is now close to the 1.00 value:
Now, this is important - as a general rule of thumb, if any instrument in solo (that is the lead, bass or percussion group) makes the Correlometer stay as close to the 1.00 value as you saw in the previous picture with the stereo width of a whole mix:
Then I wouldn't bother with using on this sound mid/side equalization, as that sound would be so narrow in the stereo field it likely wouldn't benefit from any mid/side processing.
Using mid/side equalization when the Correlometer is close to the 1.00 value makes sense essentialy only when mastering the track - but only because I process the whole mix with all instruments. That will make any processing easier to hear.
Also, in other situations, when you can't access individual channels to improve the mix, mid/side processing during mastering is the only way to improve the stereo image if that's necessary.
Mid/side EQ on a reese bass
In this hard techno/schranz track, after the main drop, I play the whole kick drum and percussion pattern with a synthesizer melody.
On top of everything, to make the drop stronger, I decided to add a reese bass sound. In solo, it sounds like this:
You would think such a sharp bass will be easy to hear among all the distorton and sounds that play in the beat. The reality is that I already decided the main lead sound to be most upfront in the mix, so I needed the bass to be a bit in the background:
Just so you can compare, here's the same beat, but without the reese bass:
The mix is extremely crowded, so no wonder the bass isn't audible much.
I can't just make the reese louder, because I will start to cover the synthesizer lead, making the track sound less melodic.
The next idea is to make the bass brighter with a high-end boost. The truth is that my reese bass already has that boost in the stereo equalizer.
High frequencies are boosted here equally in both Mid and Side parts of the bass:
Boosting the high-end more here would make the bass feel too grainy. The beat would start to sound too bright, and, as a result - annoying. I'd also risk pushing the bass to much to the front, which could cover the lead synth.
Turning up the volume of the reese will make it cover other instruments. Boosting the high-end more in stereo will make the beat too bright. Another idea would be to turn up the stereo width of the bass, but as you've seen earlier, my bass is already very wide:
A solution that will work here and be more subtle than any of these three ideas above is a separate high-end boost that's applied only to the Side signal.
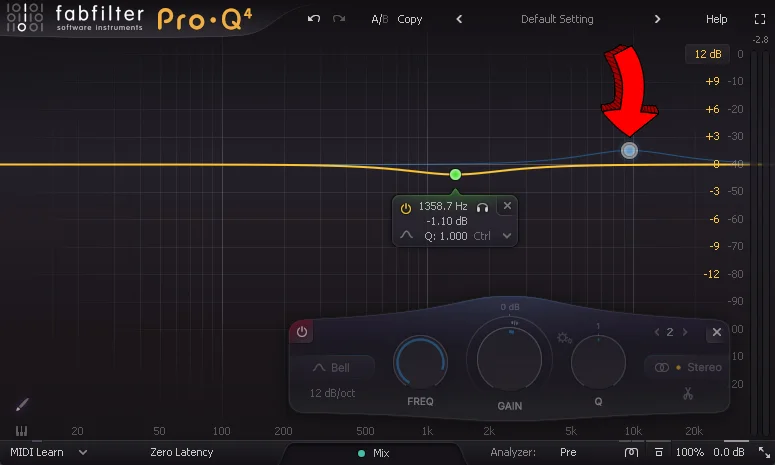
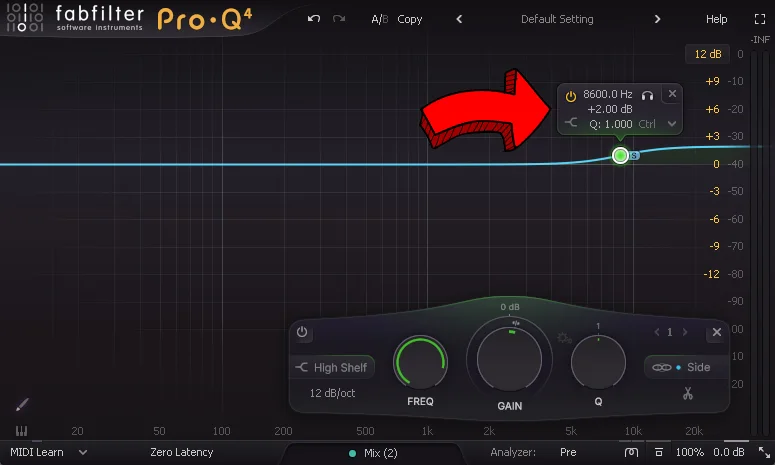
In the FabFilter Pro-Q 4 equalizer, I add a high-shelf filter that will boost the high-end in the most natural way.
Then, I click the menu on the far right of filter settings, and choose the Side option to make this filter affect only the Side signal:
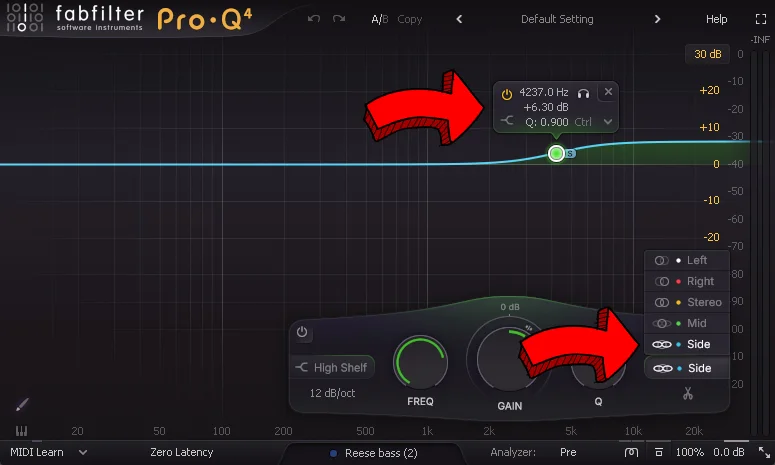
After such equalization, the reese bass gets more presence in the mix, without covering other sounds:
Of course, the effects of this mid/side equalization will be hearable only when listening to the stereo mix.
If we listened to the same track in mono, the reese bass would sound the same - regardless of whether the Pro-Q equalizer is turned on or off.
But I'm totally okay with having the reese bass lost or almost inaudible in the mono mix. That's because I value a clean sound with nothing covering the lead synth more than a beat with a loud reese bass that isn't even the most important sound.
If you would like to learn more about this hard techno/schranz beat I just used in this example, you can click the video below to watch my 2-hours long tutorial on how I built it (and the whole track) from scratch in Ableton:

Mid/side EQ on a pad sound
In this industrial techno track, I have a beat with just a kick drum and an atmospheric pad sound playing:
This may be not noticeable at first listen, but if we compared this mix to professionally mixed hard techno tracks, you would say that my mix isn't as clean as it should.
Assuming the kick drum and rumble are equalized properly, this leaves us only with the pad sound, where we can get rid of some of the lower mid frequencies dirt.
But at first, let's listen to the pad in solo, so we can hear that dirt in the sound better:
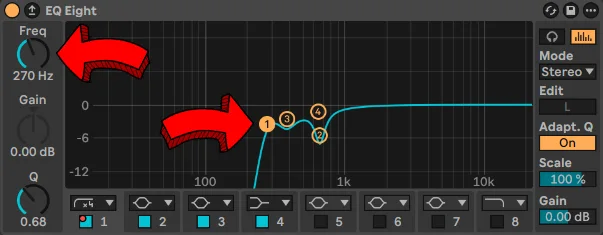
You can't hear there any low frequencies - that's because this pad is already equalized - this time with Ableton's EQ Eight:
So, what we can do about removing the dirt out of the pad?
The most obvious solution to try would be to just turn up the cutoff frequency for the high-pass filter I already have in this equalizer:
Unfortunately, if I play now this pad along with the kick drum, the beat starts to feel too empty - even if the change in the high-pass filter is little:
The problem with this pad is not necessarily in the whole stereo sound. As I've shown earlier, this pad is a pretty wide sound:
And if you listen to the industrial techno beat on headphones carefully, you will realise that we hear most of the dirt only on the "sides" of the pad.
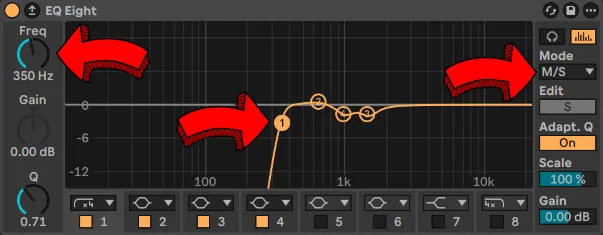
This gives us another opportunity to use mid/side equalization. We can remove the extra dirt from the Side signal, but we keep the Mid one intact.
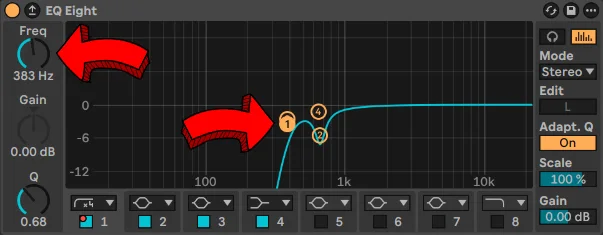
I added to the pad sound one more equalizer and made a few tweaks, but out of them, an extra high-pass filter is the most important.
Notice that the cutoff frequency on this high-pass filter is set to 350 Hz - that's a bit higher than the 270 Hz we had initially in the first EQ Eight instance:
If you listen to the industrial techno beat after such mid/side equalization, the beat will sound as clean as needed, without a feeling of an empty sound:
This industrial techno beat was made with my Hard Techno Reinforcement (Vol. 1) sample and Serum 2 preset pack, filled with distorted kick drums and many other sounds you can use for your own productions.
Mid/side EQ during mastering
In the last example, we will return to the hard techno/schranz track.
After finishing the mixdown of the track, I started mastering it. When listening to the main drop again, I noticed ride samples being not upfront enough:
Assuming I can't work with individual channels anymore, what can I do about rides?
Ride samples usually dominate higher frequency areas. This is what does the frequency spectrum look like if I use Voxengo SPAN on my rides:
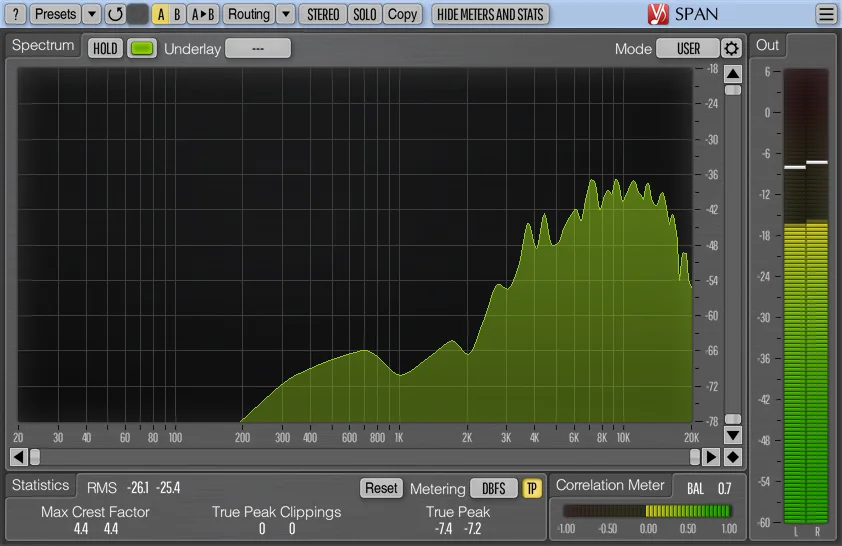
And this may give you an idea to boost the high-end of the whole track to make rides more upfront:
Unfortunately, this makes the mix sound too bright and noisy, despite applying only 1.6 dB of gain.
During mastering, all the adjustments are applied to the whole track - even small tweaks can give a noticeable impact:
Fortunately, ride samples in my track aren't mono - just like the reese bass, they also have some stereo width:
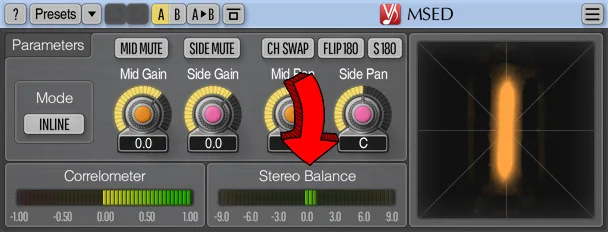
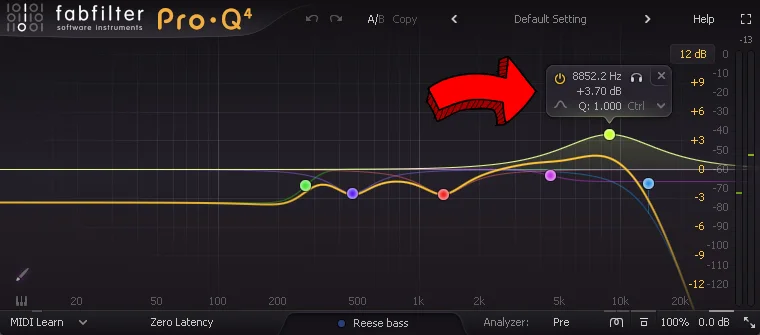
This time, if you look at the Correlometer, it shows a positive 1.00 value, suggesting the rides are a mono sound.
However, a Stereo Balance meter that I highlighted with an arrow isn't completely in center.
Because this meter shows a value just a bit higher than 0.0, it means the rides are slightly louder in the right channel. And this can also suggest a presence of slight stereo width.
Why? I don't want to deviate too much from this practical example, so now, I will only say there is a relationship between left and right channels and the Mid and Side signals:
Plugins that apply mid/side processing split the left/right signal into the mid/side one with following formulas:
Mid = Left Channel + Right Channel
Side = Left Channel - Right Channel
The minus sign means the right channel is added to the left one with inverted phase.
Now that I explained there's still some stereo width in the rides despite the Correlometer suggesting something different, I can tell you my idea for mid/side equalization in mastering.
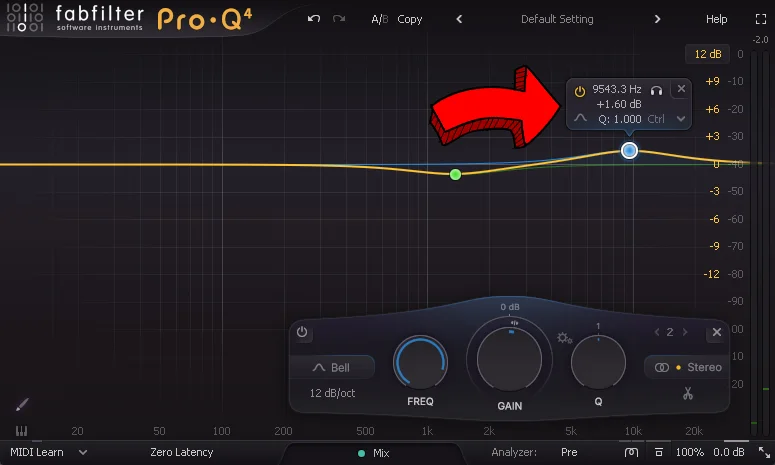
I will turn off the high-end boost I made in stereo:
And instead of that, I will add a high-end boost with a high-shelf filter, but only in the Side signal:
Thanks to that, I will avoid adding extra brightness to sounds that are heavily in the "center" (as these sound don't need a high-end boost). The whole equalization will sound less aggressive despite larger Gain.
If you remember the first mid/side EQ example - the one with the reese bass - you know the reese bass was also a wide sound.
What I did right now with the last filter during mastering will also affect the reese bass, adding a bit of brightness to it as well.
Fortunately, the reese bass in comparison with rides is so quiet that this is not a problem at all.
Finally, let's listen to what does the track sound like after the mid/side boost of the high-end during mastering:
If you like this schranz track I used for this example, you might be interested in buying the whole Ableton project of it to learn many more advanced hard techno production techniques.


